Brief History
My first camera was acquired as a young medical student. I quickly learnt the nuts and bolts of photography from a marvellous little Penguin publication and a series of lectures on Art (arranged by my friend and fellow student, Aubrey Lurie) provided some feeling for proportion and the harmonies of space and perspective.
Over the succeeding 4 decades I took thousands of photographs eventually having progressed to a Canon SLR camera. At one stage I even managed to set up a darkroom and start on the process of learning to make my own B & W prints. But the pressure from my academic and professional life proved too intense and, other than collecting innumerable slides, there was no time for real personal development. Prints were invariably a bitter disappointment since the image seemed to bear no relationship to what I was seeing though my viewfinder
When finally the digital age arrived, I was retired and at last time was available. I leapt in and, starting with primitive point and shoot cameras, in the space of about 10 years I and my shooting companion, Rosemary Pegoraro, gorged ourselves on everything available – Picassa, Photoshop Elements, Proshow Standard – then Gold and finally Producer – then onto movies using a Sony HDR-FX7 1080-60i HDV Handycam Camcorder and Sony Vegas Movie Studio HD Platinum 11 for editing.
Alone and together with Rosemary, I produced photojournalism, home albums, slideshows set to music, natural sounds and narration, then moved into mixed slides and videos and, finally, onto fully fledged movies. I even sold some prints using the professional expertise of Orms. Along the way we produced some successful public shows, published articles and acquired the disappointments and bruises which come from going beyond one’s technical expertise. Most of this will be summarised in a separate page on this blog as part of maintaining decent records.
But it was now time to stand back and take stock. Given my age, general impatience and financial constraints, we have foregone formal instruction in favour of learning from the resources on the web and our own painstakingly acquired experience. Like the field of medicine, photography offers the enthusiast an overabundance of choice.
So as part of the process of consolidation and re-assessment, we have started looking much more carefully at still image production using that marvellous software programme Lightroom 4.2 and still relying on the Canon “Rebel” range of DSLRs for the actual photography. In this post I examine the process of producing a photographic image from the RAW file using Lightroom.
A rather simple but basically pleasing landscape was deliberately chosen to avoid undue technical complexities. To real photographers, this will be Photography 101 but for others, it may prove of interest. For myself it helped consolidate some of the material I had learnt from the George Jardine set of video tutorial s on Lightroom which can be found here. He produces some of the best instructional videos I have ever encountered.
PS. The best way of visualising the images below is to right click on each and open in a new tab. That opens up much larger images which you can page through sequentially.
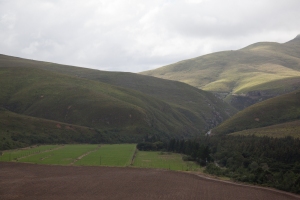
Snapshot 1 – The RAW Image
The photo was taken near Suurbraak in the Western Cape (April 8,2013 at 3.44pm) in RAW with a Canon 500D DSLR using the EF-S17-85mm f4-5.6 lens at ISO 400, 1/1000sec,  f6.3, focal length 59 mm with exposure setting “centre-weighed average”. For processing it was left uncropped. The Temperature reading was 5350. Of course the RAW image is not an actual reproduction of the scene in my viewfinder (if such a thing is actually possible) but provided the substrate to create an image intended to capture the particular charm and ambience of the view at that moment on the day.
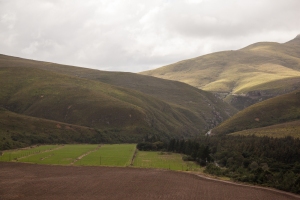
Snapshot 2 – Minor tweaks in the Basic Panel
Some minor adjustments were made in the Basic Lightroom Panel: Temperature was  increased to 6155 to provide some warmth and the clarity and vibrance slightly increased to 27 and 28 respectively to sharpen midtones and increase colour vitality. The histogram showed a lot of shadow, small midtones and substantial highlights from the somewhat overexposed sky.
Snapshot 3 – The Point Curve
Although these small initial adjustments did increase image impact it was felt that the light and shadow on the mountain contours needed strengthening using the Tone and Point panels of Lightroom. Since I prefer the Point curve for the freedom it provides I used that exclusively to produce the following version.
Snapshot 4 – Gradient tool on the sky
The sky was grossly overexposed so using the Gradient Tool I reduced the exposure and  deepened the shadows thus enhancing the sky considerably by bringing out detail lost in the over-exposure.
Snapshot 5 – Gradient Tool repeated
Since the entire bottom left of the image looked very dull, using the Gradient Tool again, I  increased exposure slightly and especially lightened the shadows, strengthened clarity and increased saturation slightly. The photo now appeared to me to approaching completion.
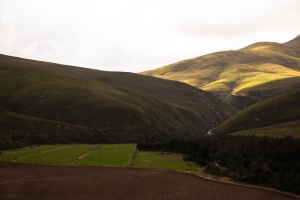
Snapshot 6 – Final tweaks
- Used automatic Lens Correction feature to correct barrel distortion and lens
 vignetting in the corner
 - Then used Post –crop Vignetting to introduce a very small amount of vignetting back again.
- Finally went back to the Basic Panel to lighten the shadows and give more contrast and visual impact to the final picture.
Comments
The higher resolution of these images will also be on Flickr here. On second thoughts I would reduce exposure of the sky on the last image (snapshot 6) a trifle. The picture is pleasing without being dramatic but is marred by the bits of gravel showing though the vegetation on the mountain. This could possibly be removed using the L:ightroom Healing and Spot removal tool. Comments from readers would be welcome but even the set of snapshots I have included demonstrates the power available in the Lightroom software to create more vital and interesting images. Has it worked for you?
Mike Berger

Interesting Mike – but my monitor will not give me the same result as yours – so the question is how will it look printed?
LikeLike
Of we both standardised our monitors it would appear the same. I have done little printing of my own work but have taken it to the professional division at Orms. In B&W the results are good – don’t know about colour.
LikeLike